skip to main |
skip to sidebar
My father wasn’t into having a lot of possessions, but he was very particular about the way he dressed. I never saw him wear flip-flops or sneakers—only lace up oxfords or golf shoes (both usually alligator) and always with black or charcoal gray cashmere socks.
When my father passed away in the early 90’s, we gathered enough cashmere socks to fill a hefty trash bag. My sister was ready to send them off to Goodwill, but I wasn’t ready to part with them (I’m a sentimental hoarder). They sat in the bag for some time—I wasn’t sure what to do with them. Some of the socks were well worn with a hole or two, while others looked brand new—but all of them were either black or charcoal gray...and very soft.
 One weekend I sorted all of the socks by color (black or gray) and if they had any holes (usually on the heel). I started cutting the holes off and splitting the socks open, and realized I had a generous swatch of cashmere. I decided to patchwork them together—not sure what I would end up with...maybe a throw blanket. I decided to try and make a patchwork sweater out of my cashmere sock pieces.
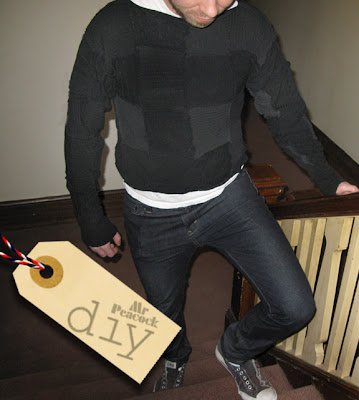
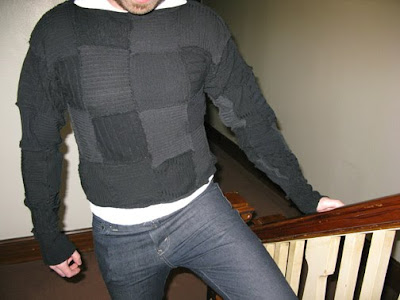
Here’s how Mr. Peacock made his cashmere sock sweater. Whether you’re an experienced crafter or a newbie, this project is fairly forgiving—“mistakes” and haphazard stitching add to the uniqueness of the sweater. This sweater doesn’t have a neat and tailored cut, it's more of a bohemian loose style. I would plan on dedicating a weekend to finish this project. I hand stitched it, because I think it added to the style of the sweater, but you could certainly use a sewing machine.
 Here’s the tools you will need:
• Needle & Heavy duty thread—I used a heavy upholstery thread
•
Straight pins
Sharp
• Scissors
• Glue stick
• Sharpies
•
Ruler
• Newspaper
• Sweater Shaver—you can get them for a few bucks at discount stores like Walgreens (my mom gave me one years ago, I though it was a joke, but this little tool is amazing—it “shaves” off any pilling or loose threads on wool or cashmere without damaging the garment)
• A bag of old cashmere or wool socks (you could also use a few old holey cashmere or wool sweaters instead of socks)
 First you'll want to make a "pattern" for your patchwork sock sweater from a favorite existing pull-over sweater in your wardrobe.
 Glue stick pieces of newspaper together and lay out on the floor. Place your sweater on top of the newspaper and trace with a sharpie pen.
 The lines don't have to be perfect, but if you prefer you can use a ruler. Cut the pattern out along the lines and set aside.
 Wash all of the socks in hot water and throw them in a dryer. They’ll shrink a bit, but the washing process will almost “felt” the wool or cashmere and deter unraveling when you cut the pieces. I don’t recommend cotton because it will tend to unravel and be problematic.
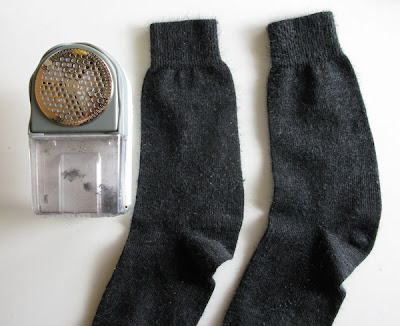 After you wash and dry your socks, carefully shave any pilling (little balls and bumps) or excessive fuzziness.
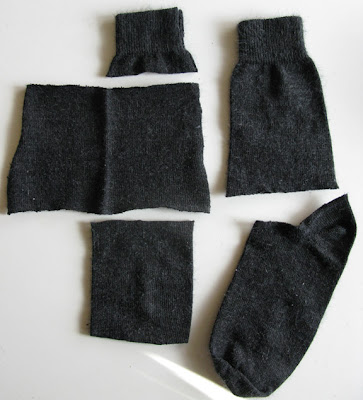
You can now begin cutting the pieces. I was somewhat methodical about cutting. First I cut the tops off (make sure to save 2 elasticized tops for your sleeve bottoms), then the heels, and so forth. The goal is to get large swatches of cashmere (or wool).
 I stacked the pieces into like colors and textures (some were smooth, and some were ribbed). I then laid them out on the floor over my paper pattern, leaving enough to cover the pattern—until I was pleased with the arrangement of the shapes. It’s good to mix the colors and textures. I then pinned all of the pieces together, and repeated the entire process.
 I used a basting stitch (above), with course upholstery thread. Baste all of the pieces together—leaving a ¼ inch seam allowance on the corners.
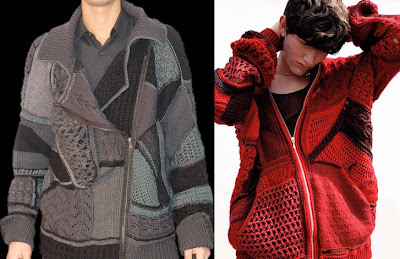
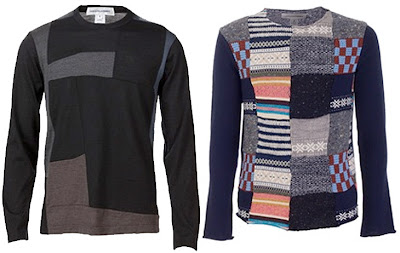 Above: A couple of patchwork sweaters from Comme des Garçons Winter 2009 season for inspiration. You can mix patterned socks with solids for your homemade patchwork sweater.You should have 2 basted patch worked pieces of socks that fit over your newspaper pattern. Place the pieces together, with the basted sides facing out. Lay the pattern on top, and pin the 2 pieces together, using the pattern perimeter as your guide. Don’t pin the bottom of the sleeve openings or the neck opening. Baste these together, and remove all of the pins.
 Above: Dolce & Gabbana featured a few patchwork sweaters in their Winter 2008 collection. It's the same idea as my sweater—I like the gray palette.
Carefully try on the sweater. Now is the time to make any adjustments, like making the sleeves tighter, the sleeves longer (I made my sleeves longer), or the body length shorter or longer (I left mine shorter).
Now take the 2 saved elasticized sock tops and baste each one on the end of the sleeves (inside out).
 With the sweater inside out, go over all of the seams with a blanket stitch (above). Trim the neck to your liking. I chose a boat style neck on my sweater. Blanket stitch along the entire edge of the neck. Carefully remove any loose threads, and it's ready to go. I think the sweater looks equally appealing with the sewn seams showing, or turned inside with the sewn seams hidden—it just depends on your mood and style.
 Above: Mr. Peacock loves the knitwear by Clare Tough—a couple sweaters from 2008. I like the addition of the asymmetrical zipper
.
Depending on your sewing experience, you could add a zipper or buttons on the front of your patchwork sweater.
 As I said, this project is fairly simple, even if you are a beginner crafter. Once you get started, the process will make more sense to you. This patchwork sweater would make a great gift too. If you start this weekend you can make one as a holiday gift...and one for yourself!
 (click image above to enlarge)
Money is on the mind of everyone right now! My neighborhood grocery store has one of those self-service automated machines that counts your coins and gives you a receipt with your total, which you then exchange for cash at the front counter. Each time I’m at the store, someone is pouring a large container of saved coins into this machine hoping for a large total.
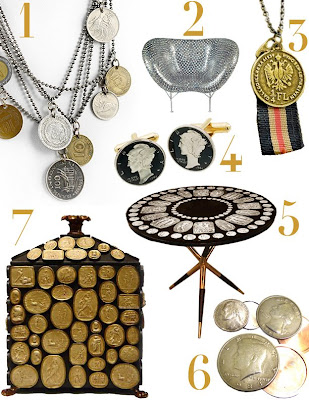
Here’s some of Mr. Peacock’s numismatic inspired goodies on his wish list right now:1) I like the way this foreign coin necklace looks! I think it would look interesting draped around the neck of a gourd style lamp. You could also make your own charm necklace with all of the souvenir coins from your own travels.
2) Mr. Peacock has been obsessed lately with the estate of the late floral designer/party planner extraordinaire—Robert Isabell (and fellow Gemini). He was a keen collector with exquisite taste...and what treasure-box home he created (see more here)! His estate will be auctioned at Southeby's on December 17th.
 He had an amazing coin sofa (shown above in a room at his home, from the NY Times) designed by the artist Johnny Swing, made up of over 7,000 nickels and 35,000 welds (detail below left).
 The sofa is too large for my apartment, but the butterfly chair (#2 at top) would fit quite nicely. It’s made up of over 1,500 half-dollars and 7,000 welds (detail above right). It would be very luxurious lounging on money!
3) This vintage inspired gold coin and ribbon necklace would be a handsome gift for any hero in your life.
4) There are many different cuff links available made of vintage or replica coins. I like these elegant cuff links made with vintage Mercury dimes embellished with black enamel.5) Everyone needs a touch of Fornasetti in his or her home! This brass and wood tripod occasional table decorated with drawings of Roman coins would add a chic decorative accent to your décor.
6) Mr. Peacock has always liked anything with a secret compartment (especially my Pee Wee Herman watch!), and these “Spy Coins” are no exception. The tops of these real coins pop off revealing a hidden hollow space perfect for hiding an illicit piece of paper, your bank code, or some high tech tracking device. These coins are the perfect stocking stuffer for the person who has everything!
7) This decorative lidded box (14.5"H x 11.5"W x 8.5"D) adorned with faux Roman coins reminds me of my mom’s vintage faux Roman coin medallion brooch. It would be a perfect vessel for saving cherished cards and letters.
8) Mr. Peacock has amassed a collection of exonumia (flattened embossed souvenir pennies) from various destinations across the United States. The machines are frequently located at touristy spots. Each one costs fifty cents, plus one sacrificial penny.
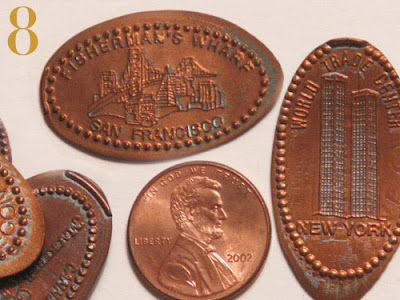 I just love watching the penny roll down the gears and get rolled flat, and then embossed with the tourist location...and plop out as a warm oval disc at the bottom of the machine. I’m not sure what I’ll do with my collection of embossed pennies...I guess I could make a charm necklace.
Anyway, I’m very glad to be back after a brief blog sojourn. Thank you for all of the kind emails and wonderful comments—I appreciate it! I hope everyone has an abundance of coins this holiday season!
 Mr. Peacock is happily buried under project deadlines right now, but I’ll be back next Monday. Thanks for stopping by, and for all of the wonderful emails (I’ll be catching-up on emails this weekend too) and comments! Happy Thursday.
Take a moment and think about your favorite teachers you've had in your life. How did they influence your life path, your style and the way you view things? Mr. Peacock has 4 favorite teachers who all had different teaching styles (and personal styles) that influenced my life (and personal style).
 Mr. Burrous, my junior high school Russian (last week I mentioned my Russian medal) teacher dressed somewhat preppy, and often wore a tie (completely opposite style of my father). I know I was a difficult student too—I talked a lot in class and could be sassy (a smart aleck). Mr. Burrous had patience and was very creative with his teaching methods. He made learning a language fun and interesting. He didn’t simply regurgitate lessons out of a book either—he used creative methods to teach foreign language.
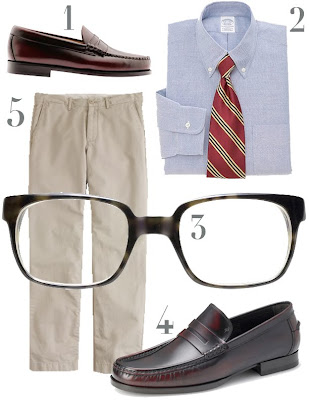 Mr. Burrous's—Inspired look click image to enlarge
1) Classic American oxblood penny loafer2) Classic blue button-down oxford cotton shirt and striped Repp tie
3) Tortoise glass frames
4) A sleeker Italian oxblood loafer
5) ChinosMr. Burrous even had us play “Hollywood Squares,” in Russian of course. He also taught us about Russian culture and food. We spent an entire week (each year) making Ukrainian Easter eggs (pysanky). Mr. Burrous and his wife also had a mail order store and sold pysanky supplies. Ironically, some parents didn’t allow their children to take Russian because they thought it was Communist (how stupid is that). I’m glad my parents were intelligent and encouraged me to learn.
 Mrs. Ghering, my high school composition for college teacher, didn’t dress or teach like the other suburban looking teachers at my conservative high school. She wore all white (year round) in homage to Emily Dickinson. Her white ensembles always included a perfectly coiffed white wig, a white turtleneck, white slacks, white lipstick, and vintage Native American turquoise jewelry...including a ring that went over 2 fingers (sort of like brass knuckles that had a turquoise stone about 4 inches in diameter). She also often wore white or muted colored Native American woven ponchos with clear acrylic mules.
 Mrs. Ghering's—Inspired look click image to enlarge
1) Native American turquoise jewelry (Mrs. Ghering's were vintage)2) Helmut Lang hooded knit poncho
3) Sleek stretch cotton pants
4) Clear acrylic mules
5) Sterling silver double finger ring (Mrs. Ghering's had a huge turquoise stone on top)
Shakespeare really came to life in her classes. She would frequently read the different parts in character. Mrs. Ghering was inspiring both visually, and with her dynamic teaching skills. She had high expectations (which I like), and if you didn’t fulfill her expectations she would call you “a bad egg!” ...And who wants to be “a bad egg?”
 My college design professor, Judy Anderson, is talented, articulate and soft-spoken. Like the women in my family, Judy’s personal style wasn’t girly or overly made-up. Her personal style was clean, comfortable and natural. She never raised her voice (unlike a few bosses I’ve had), and always gave straightforward critiques and design advice. She was also a stickler for well-crafted typography, attention to details, and problem solving. In addition to being a great designer, she’s also a dynamic artist and her artwork was also inspiring.
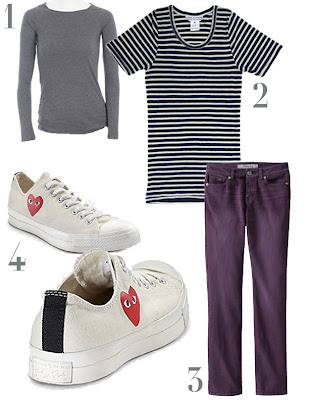 Judy Anderson's—Inspired look click image to enlarge
1) Boatneck t-shirt for layering2) A soft wool t-shirt
3) Uniqlo colored skinny jeans
4) Comme des Garçons Converse sneakers
I was frequently broke in college (and frequently had some personal drama too), and on occasion tried to use that as an excuse for not giving 100% on an assignment. I remember Judy once told me, “If money is your only problem, then you don’t have any problems....” She made me push my creativity and problem solving. I still think of her when I’m on projects with tight budgets (or in my own life when I’m on a tight budget)—and push my creativity to solve problems.
 Another college design professor, John Norman, stressed the importance of innovative ideas. His personal style was sort of like a sporty James Bond—good looking, tan…with a casual elegance. He always wore tinted Ray Ban style glasses that would get darker outdoors in the sun. His teaching style was somewhat loose, but he always wanted to push you to experiment and innovate with your design process and materials. In addition to his design background, he experimented with dying and printing textiles.
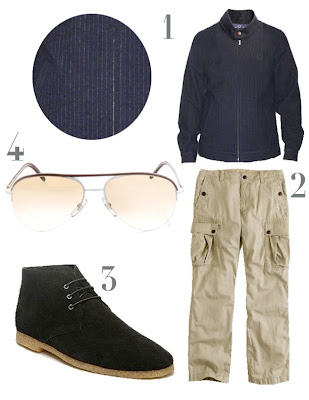 John Norman's—Inspired look click image to enlarge
1) Navy Wool pinstriped Harrington Jacket2) Cargo pants
3) Black suede desert boot
4) Leather trimmed aviator glassesI like experimenting with my process, but would sometimes quickly move on to something else if I didn’t think it was going to work. He would guide and push you to flush out ideas and see what it would lead to—even if it didn’t work. I still try to force myself to innovate, experiment and try different things and processes in my design work (and in my life too). Sometimes the ideas that don’t work lead to other ideas that do succeed.
My favorite teachers all had an enormous influence on who I am, and what I do. Mr. Peacock is grateful for the opportunity I had to learn from these fantastic teachers….and thank them for their commitment to teaching!
Who was your favorite teacher?
 Mr. Peacock has always had a thing for jackets (and shirts) with lots of pockets—the more the merrier. Pockets, historically speaking, always served a utilitarian purpose on a garment (form follows function).
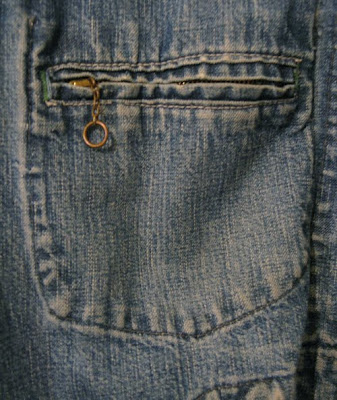
 Above: Mr. Peacock’s cherished vintage Osh Kosh denim work wear jacket with functional pockets (see pocket detail at top).
Each pocket was there for a reason, whether it was to hold a tool, identification cards, hunting accouterments, or even just keys. I guess that’s why I like pockets too—they hold all the stuff I like to carry with me including my subway pass, post-it notes, business cards, and various other bits.
There are many great garments, with pockets, this season for gentlemen peacocks. And the wonderful vintage work wear vibe is strong. Admittedly, the pockets are now often more decorative than utilitarian...but hey, everyone can use an extra pocket now and then. Here are some of Mr. Peacock’s pocketed favorites.
 Contrasting grays make this wooly shirt jacket both good looking and functional.
 The jacket has a hidden front zipper and button placket.
 Mr. Peacock is swooning over this charcoal gray heavy Melton jacket, although it may be a too warm for San Francisco (with the exception of a handful of very cold days).
 The detailing on the backside. I like the contrasting white stitching too!
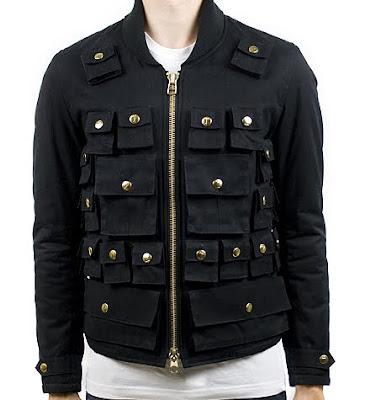 This cotton bomber jacket with detachable pockets is more military inspired than work wear inspired. There’s even pockets on the backside.
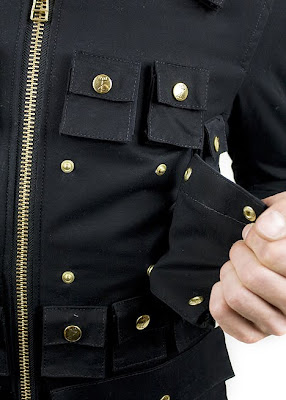 I love the detachable pockets, and the chunky gold zipper and gold hardware.
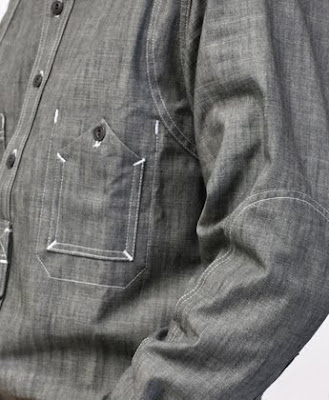
 Mr. Peacock also loves this denim shirt with 5 pockets. The smaller fifth pocket would hold my subway pass quite nicely.
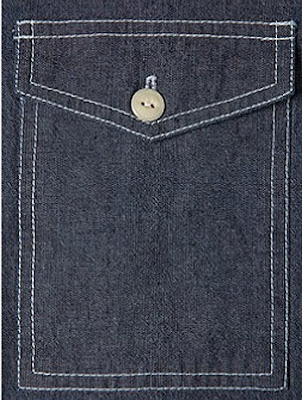 A pocket detail of this work wear inspired denim shirt.
 This engineer’s jacket is homage to the workers of the American Machine Age.
 But you don’t have to be a construction worker on a skyscraper to appreciate the details and practical construction of this amazing jacket.
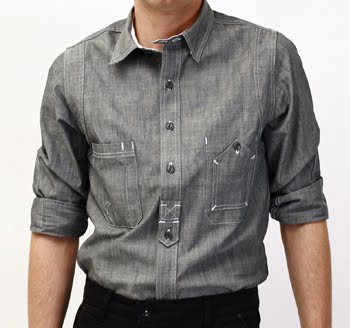 This utility chambray shirt also has many wonderful details including the front placket...
 ...and the chest pockets and elbow seams.
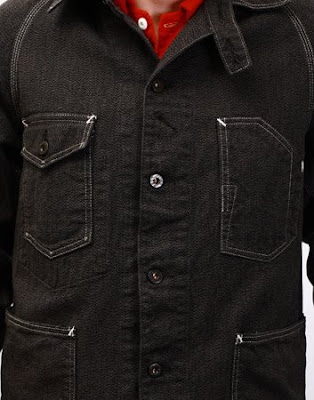
 A pocket protector would be difficult to insert on this black cotton shirt with layered chest pockets (at right).
What do you carry in your pockets?

 Elbow patches began as a strictly functional repair—a way to hide wear and tear on jackets, shirts or sweaters. Over time they became mere decoration...and somewhat of a cliché...think of a pipe-smoking gent in a tweedy jacket with oval suede elbow patches standing by a fireplace. The elbow patches of today are far from cliché, and aren’t limited to just oval swatches of suede.
 This jacket is traditional tweed, but the elongated rectangle elbow patches are very modern.
 This corduroy blazer with suede elbow patches is a classic piece—and I love the lining too!
 Mr. Peacock loves this modernized tweed hunting jacket with beautiful pocket detailing...
 ...and elbow patches. It's at the top of my holiday wish list! (here's another tweed jacket—with tweed elbow pads).
 You won’t feel like Mr. Rodgers in this simple and elegant camel colored wool cardigan sweater with leather patches. It's also available in navy.
 This slim red cardigan with leather buttons and suede elbow patches and would be festive this season.
 Mr. Peacock likes the contrasting red wool buffalo plaid elbow pads on this navy crew knit sweater.
 Here’s a navy merino wool turtleneck with elbow patches.
 This vintage inspired Pendleton shirt with suede elbow pads looks cozy.
 Another vintage inspired shirt with elbow pads.
 Buffalo plaid is given a different twist as a rugby shirt with elbow pads.
 You can find ready-made elbow patches at your local fabric store and sew them onto your own garments—or have a tailor sew them on for you.


